ECHOINK GUIDE For version 2.5.2
Download & user guide
Install the plugin, connect a model, and learn to chat, attach files, and manage memory.
Stable version 2.5.2 Released September 27, 2026View release notes ↗
Install Obsidian first
EchoInk is an Obsidian plugin. Install Obsidian, create or open a vault, then choose an EchoInk download option below.
01 / PREPARATION
Install Obsidian and open a vault
EchoInk is an Obsidian plugin. You need to install Obsidian and open a vault before installing EchoInk.
- Visit the Obsidian website, download the version for your operating system, and install it.
- Open Obsidian and create a new vault, or open an existing folder of notes as a vault.
- Once your vault is open, continue with the EchoInk installation.
- Obsidian
- Version 1.11.4 or later. Desktop supports Windows, macOS, and Linux; mobile support is in Beta.
- Vault
- The folder where your notes are stored. For your first try, use a test vault to get familiar with the controls.
- Model service
- Have your service's API key ready, or use a supported account sign-in method. The model provider charges for model usage.
A standard installation does not require Node.js or Codex CLI. EchoInk PRO membership is separate from model service credits and fees.
02 / INSTALLATION
Install and enable EchoInk
Option 1: Install inside Obsidian
- Open Settings → Community plugins → Browse.
- Search for EchoInk Agent, open its details, and install it.
- Enable the plugin. Once the feather icon appears in the left sidebar, you can open EchoInk.
Option 2: Install the files manually
- Download the ZIP package and extract the
codex-echoinkfolder. If using GitHub, download these files from Assets:main.js,manifest.json,styles.css; do not choose Source code. - Open your vault folder and place
codex-echoinkinside.obsidian/plugins/. Create the plugins folder if it does not exist. - Check the final structure. The three files must be directly inside the following folder, with no extra nested folder.
Your vault/
└── .obsidian/
    └── plugins/
        └── codex-echoink/
            ├── main.js
            ├── manifest.json
            └── styles.css
The website ZIP also includes the open-source license..obsidian is the default configuration folder. If you use a custom folder, follow your settings. On macOS, press ⌘ + Shift +. to show hidden folders.
- Restart Obsidian, then go to Settings → Community plugins and enable EchoInk Agent.
How to tell it worked
EchoInk Agent appears in the plugin list and is enabled. Click the feather icon in the left sidebar to open the home view and chat sidebar.
03 / MODELS
Connect your own AI model
The model understands questions, generates answers, and performs actions that need reasoning. Choose a service you know; you don't need to change models to use EchoInk.
- Go to Settings → EchoInk Agent → API Provider → Add model. You can also open settings with the gear in the top-right corner of the chat sidebar.
- For a built-in provider, the API URL is filled in automatically. Usually, you only need to enter your API Key. For a custom provider, also enter the API URL and select the matching protocol from its documentation.
- Fetch the model list or enter the provider's Model ID manually. Enable the models you want and set a default.
- Test the connection, then return to the chat sidebar and send a simple question.
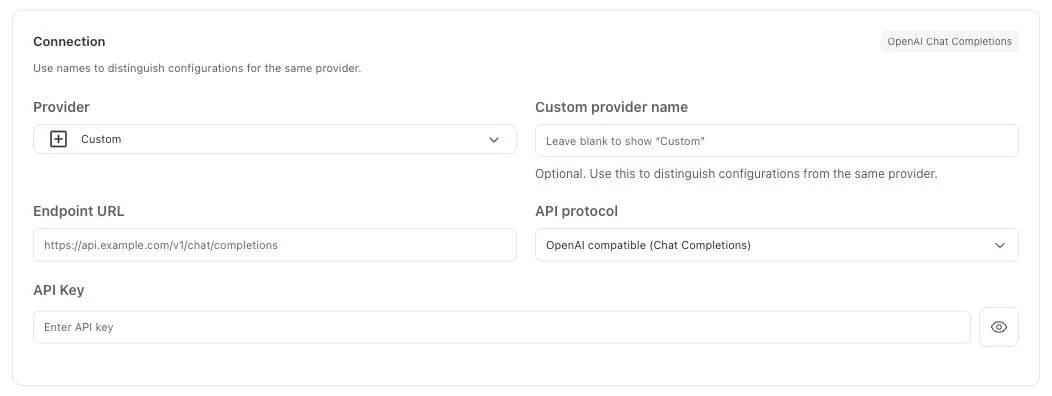
How to tell the connection works
You can select an enabled model and receive a complete answer. If an error appears, check the provider, endpoint, model name, and available credits first.
Using OpenAI Codex Beta or a local model
OpenAI Codex Beta: choose it under the provider's account sign-in group, then click “Sign in with OpenAI.” If the browser does not return automatically, follow the dialog's callback instructions. This option is in Beta.
Local models: choose Ollama and ensure the local service and model are available. The local Ollama option does not require an API key by default.
Qwen's standard API and Token Plan use different options. Choose the service you actually purchased.
Keys are stored in the plugin settings for the current vault. Never post them in public comments or Issues. With a cloud model, the conversation, notes, or attachment content needed for the request is sent to your chosen service.
04 / CONVERSATION
Work with notes and knowledge through conversation
Tell the agent what to work on and what result you want. It can answer questions or create, edit, and organize notes as requested. File access depends on your selected workspace and permissions.
Start your first conversation
- Click the feather icon in the left sidebar, open the chat sidebar, and create a conversation.
- Before sending your first regular message, use the folder button in the composer to choose a local workspace. You can start with the current vault.
- Type
@to select a note, or use + → Add current note to include it as context. - Describe the task and send it. Review the answer and tool activity. If permission is requested, check the scope before allowing it.
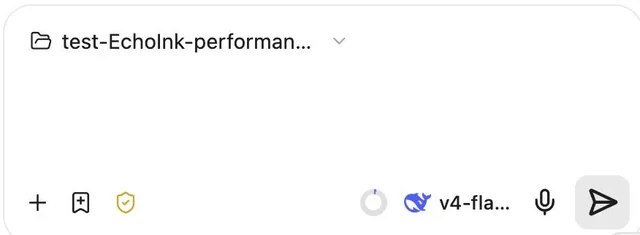
Try starting with
“Read the attached note, summarize three key points, and list the questions I still need to resolve.”
Ask: find answers in your knowledge base
Type /ask followed by your question to focus the answer on the current knowledge base and review the sources used. Useful for revisiting notes, comparing ideas, and finding conclusions you previously recorded.
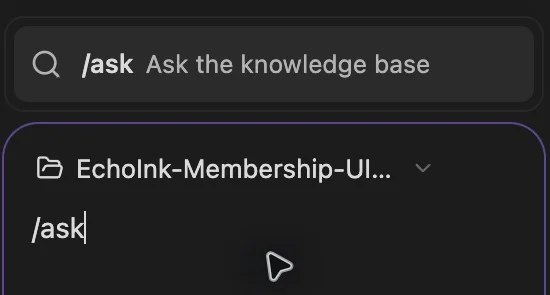
Try a question
/ask What decisions have I made about project pricing?
Let the agent organize knowledge, not just answer questions
In Knowledge Management, choose a default or custom plan, review note assignments, and confirm initialization. Then use /maintain to distill Raw notes into reusable knowledge in Wiki or Projects. For more involved organization, start with + → Plan mode in the composer and review the steps first.
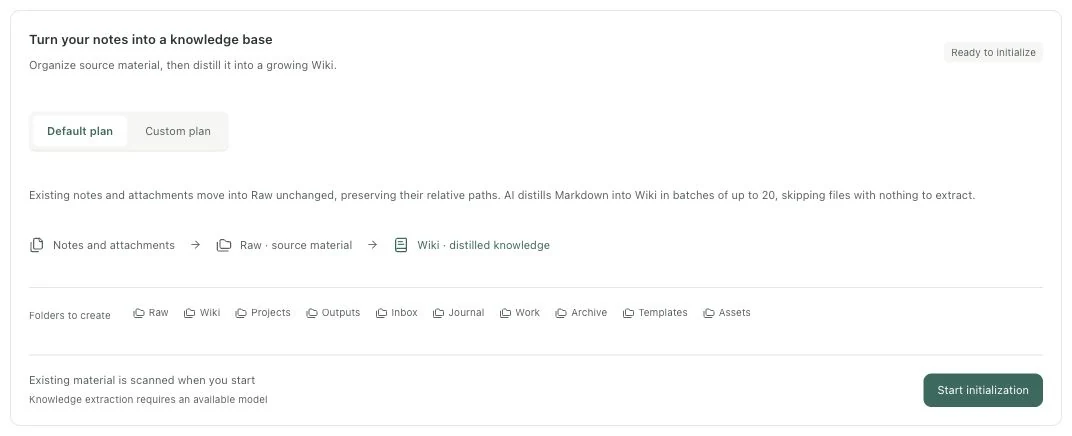
Organization changes files. Choose appropriate read/write permissions for the task, and keep a backup before moving existing material./ask and /maintain does not change your granted permissions by itself.
Continue, archive, and recover conversations
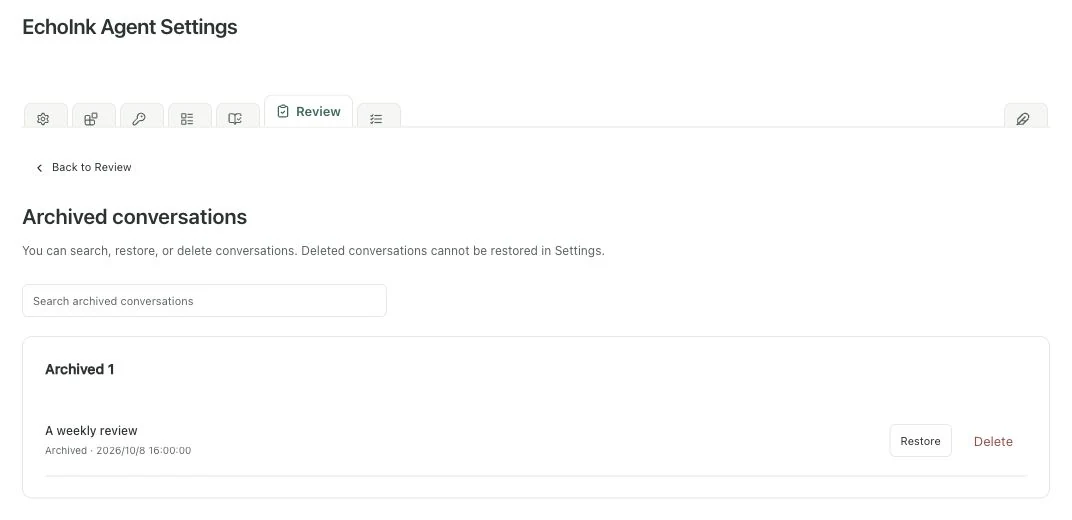
Create, rename, archive, and restore conversations. Find archived content under Settings → EchoInk Agent → Review → Archived conversations . On desktop, use Review → Manage → Auto-archive to set an inactivity period. It is off by default.
05 / ATTACHMENTS
Add images, documents, and notes to a conversation
You don't have to copy everything into the composer. On desktop, paste or drag images, or use + to select files. Check the attachment cards before sending; removing a card excludes that attachment from the current turn.
| Content | Supported formats | How to use and requirements |
|---|---|---|
| Images | PNG, JPEG, GIF, WebP | Paste, drag, or use “+ → Add image.” The current model must support image understanding. |
| Images requiring conversion | BMP, HEIC, HEIF, SVG | Converted to PNG when the environment supports it. If conversion fails, a message is shown. |
| Documents | PDF, DOC, DOCX, Markdown, HTML | Select files using “+ → Files and folders.” This version does not read an entire folder. |
| Vault notes | Markdown notes in the current vault | Type @ to search, or use “+ → Add current note.” |
Up to 8 documents per turn, with each file no larger than 20 MiB and the total no larger than 50 MiB. The model's context capacity also limits how much content can be processed.
Scanned PDFs do not currently support OCR. Encrypted, damaged, or oversized documents report a processing failure. This version does not accept Excel, audio, video, or ZIP files directly as chat attachments.
06 / MEMORY
Let it understand you, and correct it when needed
Long-term memory reduces repeated explanations. When enabled, the agent can retain useful background, preferences, and decisions for later relevant conversations. Not every sentence becomes permanent memory, and you can review and correct its understanding.
See what it remembers
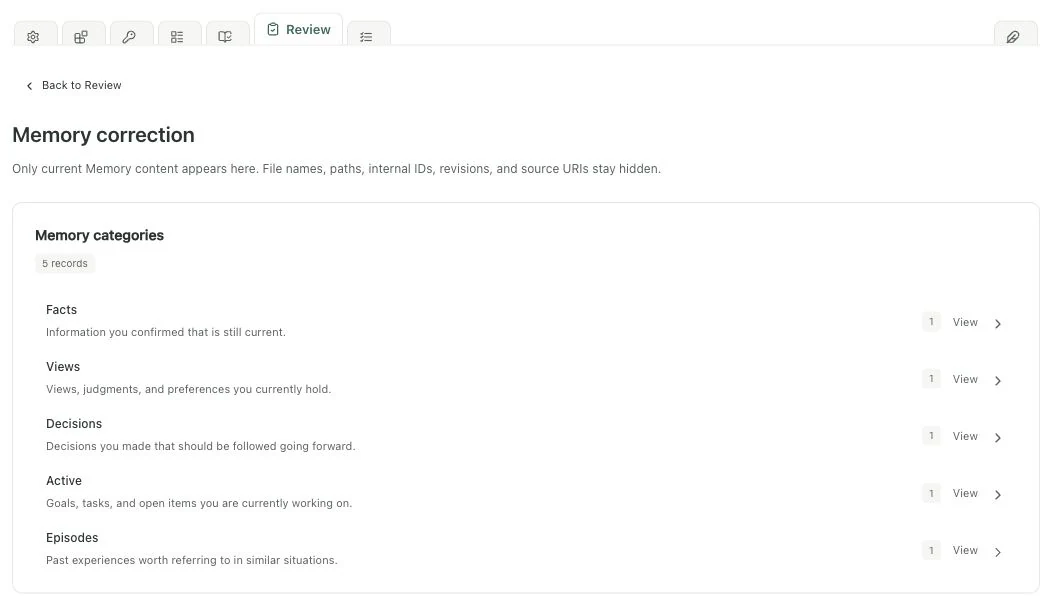
Go to Settings → EchoInk Agent → Review → Correct memories to browse existing records by category. Each memory has a title, content, and “When this may be recalled,” helping you judge its accuracy and relevance.
How to correct a memory
- Find the memory you want to change and review the original.
- Write a correction, such as “That requirement was for the previous project; the new project prioritizes delivery speed.”
- Generate a correction preview and compare it with the original.
- Save only after checking it. Generating a preview, closing the window, or canceling does not overwrite the original.
What to check after saving
Reopen the memory and confirm that the saved content reflects your correction. AI-generated previews still need your judgment.
What do automatic updates and Dream do?
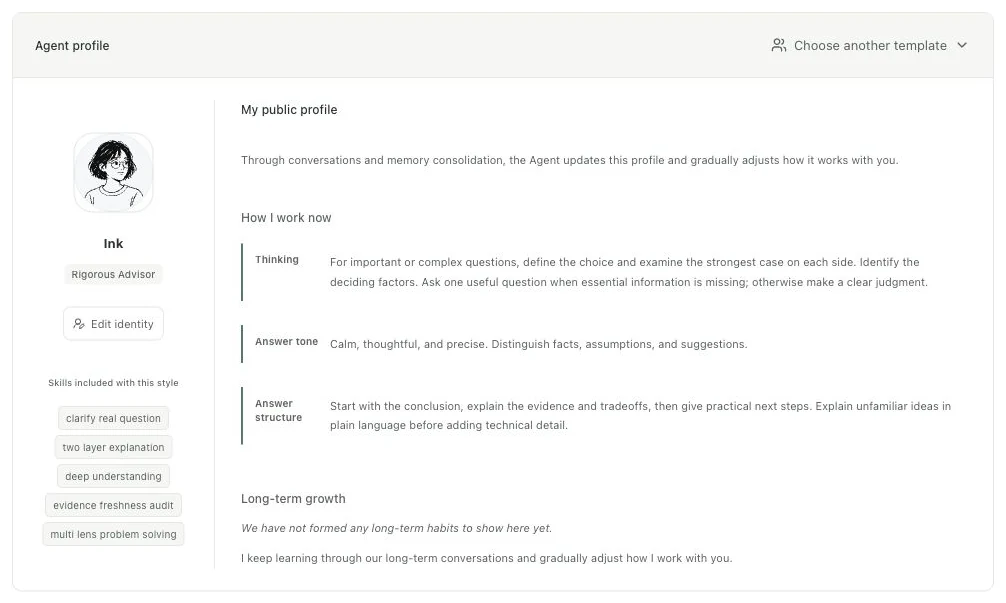
As you continue talking, update your background, or express new preferences, the agent can add or adjust related memories. With automatic organization enabled (called “Offline memory organization / Dream” in settings), it periodically organizes existing experiences and updates your profile and collaboration style, reducing repeated explanations.
This adaptation is gradual. For example, repeatedly asking for conclusions before details can guide later responses. If it misunderstands, explain directly and correct the memory. It cannot guarantee that every answer understands you correctly.
Where to find frequency, style, and switches
Go to Basic settings → Long-term memory / Identity and profile to view your profile, adjust organization frequency, or choose the agent's starting style, name, and avatar. Version 2.5.2 defaults to three automatic sessions per day, adjustable from one to six. The plugin must be running and the required model available.
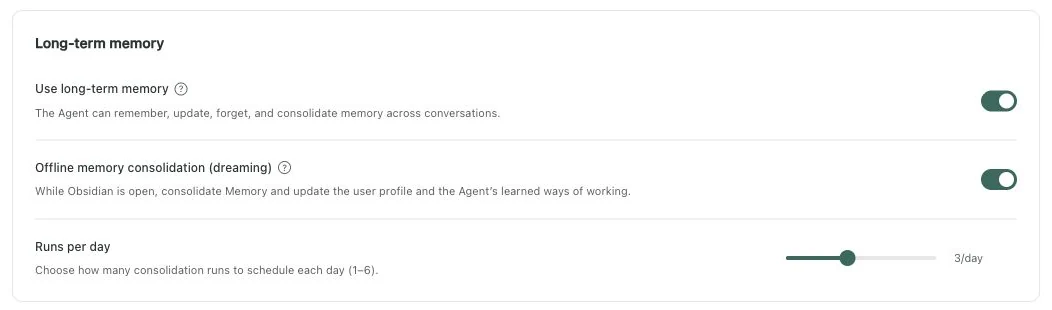
Turning off automatic organization still allows normal memory writing and recall. Turning off long-term memory preserves the name, avatar, and basic style. Changing the name or avatar does not reset existing memories.
Viewing local memory and asking AI to organize it are different actions. “Offline organization” does not mean a cloud model works without internet. Generating corrections or organizing with a cloud model still calls your configured service and may incur fees.
07 / EXTENSIONS
Reuse Skills and connect MCP tools
Skills: reuse a way of working
Connect methods that suit your tasks, so weekly reports, organization, and writing follow the relevant process. Manage Skills available to the current vault in settings, then describe the task in conversation.
MCP: connect external tools
MCP provides access to external tools. Configure and enable trusted connections in settings, complete the service's sign-in or authorization as needed, and let the agent use the tools.
Version 2.5.2 covered by this guide uses read-only MCP tools. Actual capabilities and authorization requirements depend on the connection. Do not grant unrelated permissions just to use a tool.
When you need web research
On desktop, use API Provider → Tools to configure a Tavily key and enable web search. It is separate from the chat model. Search queries are sent to Tavily, which manages search credits and fees.
08 / MAINTENANCE
Updating the plugin and using mobile
Keep your data when updating
If installed through the community directory, check for updates in Obsidian's Community plugins settings. For manual updates, back up the vault and plugin configuration, disable EchoInk, and use the same version's main.js, manifest.json, styles.css to replace the existing files, then enable the plugin again.
Replace only those three runtime files. Do not delete the whole plugin folder, data.json , or any conversation, knowledge, or memory files in the vault. Read the release notes before upgrading across major versions.
Mobile is still in Beta
After installing and enabling the same files in a mobile vault, run Open mobile chat, then go to API Provider → Models and providers to choose a built-in provider and enter the API key and model ID. Enter an endpoint only when using a custom provider.
This mobile release supports chat, reading and creating Markdown notes, local memory, and greeting settings; attachments, background tasks, CLI, and full desktop Skills/MCP capabilities are not yet included. Desktop and mobile store conversations and memory separately; history is not merged automatically. Full device testing on iOS and Android is still pending.
Cross-device sync depends on your sync method and settings. Obsidian Sync Standard has a 5 MiB limit per file. Check plugin file sizes and each device's plugin sync options before use.
09 / TROUBLESHOOTING
Start here if something goes wrong
EchoInk is missing from the plugin list after installation
Check that Obsidian is at least version 1.11.4 and that the three files are directly inside the current vault's.obsidian/plugins/codex-echoink/ , rather than inside the ZIP, an extra nested folder, or the Obsidian application folder. Restart and check the Community plugins list again.
The model is configured, but messages fail to send
Check the provider option, API URL, API key, model ID, and available credits in order. Keys are not interchangeable between services. If account authorization expires, sign in again as prompted. For network errors, first check that the model service is reachable. Do not share keys or login callbacks for troubleshooting.
Images or documents will not send
Check the supported file formats and sizes, then confirm image support in the current model and whether documents are encrypted or damaged. Scanned PDFs do not currently support OCR; convert them to selectable text before attaching them.
Memory is inaccurate or is not updating as expected
Review the relevant memory and profile for outdated context. Generate and save a correction preview, or explain the change in conversation. Automatic organization requires the setting to be enabled and a working model; it cannot guarantee understanding every piece of information.
The website demo differs from the downloaded version
This guide and the direct download package are fixed to stable version 2.5.2. Later features arrive with later releases. Follow your installed version and its release notes.
Need more help?
Include the plugin version, Obsidian version, operating system, reproduction steps, and a redacted error message.
Report an issue on GitHubIssues are public. Do not upload passwords, API keys, verification codes, redemption codes, or private notes. For orders and accounts, follow the guidance in Changelog Support & terms.
EchoInk 2.5.2 user guideRead the full guide for this version ↗